Add Sources to the Content Hub
Start setting up your sources and social integrations to show content in your Sociuu Content Hub.
HOW TO CONNECT LINKEDIN, FACEBOOK, AND BRANDWATCH WITH SOCIAL INTEGRATION
By creating a Social Integration with LinkedIn, Facebook, or Brandwatch, you’ll be able to set up sources within your Content Hub.
You’ll need super-admin credentials to create these integrations.
Depending on the platform, the connection may appear to use your personal account — and in some cases, it does:
-
LinkedIn requires authentication through a personal LinkedIn profile that has access to your company page.
-
Facebook supports both personal-connected and business-managed integrations.
-
Brandwatch connections are typically handled through your existing admin credentials on their platform, where you'll need to generate an API key to make the connection.
This connection allows Sociuu to fetch content directly from your company’s social channels and make it available for distribution via the platform.
The connection will last for 60 days, after which we will mail you about re-connecting. You can always disconnect at any time if you wish. If you notice that new posts are not appearing in your Content Hub, try clicking “Refresh Content Hub”. If the content still doesn’t update, it’s likely that your connection needs to be renewed.

Setting up a Source in the Content Hub
Navigate to the Settings in the menu, and go to General. Then go to the Content Hub, and click on Add Source.

Creating a Brandwatch Source
Now that your Brandwatch account is successfully connected from the steps you did in the Social Integrations, you need to configure it so that content from Brandwatch is displayed correctly within your Sociuu Content Hub.
When adding a new source, click on the Source Type dropdown menu, and select Brandwatch.

Next, give your new source a descriptive name.
We recommend using the same name as the Brandwatch source/channel you are setting up. This ensures it’s easily recognizable for both you and your co-admins.

You can also choose to enable the “Import Brandwatch labels as tags” option.
This allows you to use the same label system in Sociuu as you do in Brandwatch, keeping your content organization consistent.
When enabled, you have two additional options to consider:
-
Prepend Tags from Brandwatch with “f:”
-
All imported Brandwatch labels will keep their original names but will include the prefix “f:” (e.g., f:Jobs).
-
This helps distinguish Brandwatch labels from any existing tags in Sociuu.
-
-
Merge with Existing Tags
-
Imported Brandwatch labels will be added to your existing Sociuu tags.
-
If a Brandwatch label shares the same name as an existing Sociuu tag, the two will be merged into one.
-

Content Filters
At this stage, you'll set filters to determine which channels are imported from Brandwatch into Sociuu.
There are two ways to filter:
-
Select Networks
Choose one or more platforms: Facebook, Instagram, or LinkedIn.
When you select a network here, all channels under that network in your Brandwatch account will automatically be pulled into Sociuu — for example, selecting Facebook will include all Facebook pages connected to your Brandwatch. -
Select Channels
Use this option if you want more control. You can manually select specific channels from your Brandwatch account — ideal if you only want to include certain profiles or pages, rather than importing everything under a network.
Note: If you choose Option 1 (Select Networks), you can skip Option 2 (Select Channels) entirely.

The next step in setting Content Filters is "Select labels".
If you leave this section empty, all content from the channels or networks you selected in the previous step will be imported.
However, if you want to filter more precisely, you can use the dropdown menu to select one or more labels from your Brandwatch account.
By doing so, you're instructing the system to only import content that contains those specific labels from Brandwatch.

The final consideration is whether you'd like to Show dark/hidden posts.
These are promoted and sponsored posts created within Brandwatch.
Recommended here is having it disabled, unless you wish to show as well.

Creating an RSS Feed Source
You can also create a source using an RSS feed.
If your company has RSS feeds on its website — for example, for news updates, blog posts, or job openings — simply paste the feed URL here to import content automatically.
Don’t have an RSS feed available? No problem!
Reach out to us at support@sociuu.com, and we’ll be happy to help you generate one.
Creating a LinkedIn or Facebook Source
Now that your LinkedIn or Facebook account is successfully connected from the steps you did in the Social Integrations, it is time to set up the source for your Content Hub.
When adding a new source, click on the Source Type dropdown menu, and select LinkedIn or Facebook.
The next step is to name your source. This name will be visible internally to all admins, helping everyone easily identify where content is coming from.
Example: LinkedIn @Sociuu or FB @Sociuu (write the name as you'd like).
Once you've named the source, click the Company Pages dropdown menu.
Here, you'll see a list of all the company pages where you have super-admin access through the Social Integration you did earlier. You can only see pages from the selected network.
In this example, I have selected LinkedIn, and only the Sociuu LinkedIn page appears because that’s the only company page available from my integration.
If you have access to multiple company pages for the selected network, they will all be listed — simply select the one you want to create the source for.
You can only connect one company page at a time. If you manage multiple pages on LinkedIn or Facebook, you’ll need to complete the setup for one page, then repeat the process for each additional page.

Generate Missing Entries Using AI
Enable this feature to let AI automatically fill in missing content elements (such as titles, descriptions, and suggested text) for posts coming in from the source.
When this is enabled then click on Configure AI.
Content Actions

Source Primary Language
You have 2 options to choose:
-
Automatically detect the language based on the incoming content,
-
Manually select the specific language from the dropdown menu.
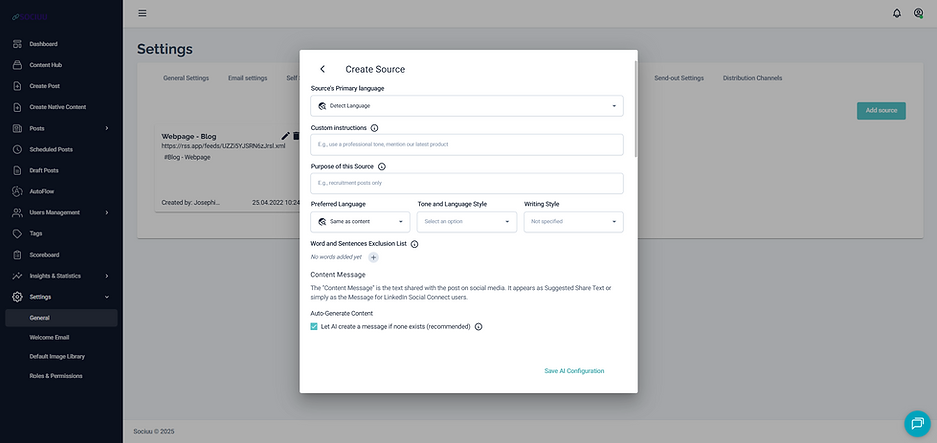
Custom Instructions
You can provide specific guidance or context you want the AI to consider when generating, such as tone-of-voice it should write in.
Purpose of this Source
Describe the main focus of this source, like news, recruitment, or company updates. This helps tailor the AI-generated content.
Preferred Language
Here you determine in which language the AI should generate the content in.
Tone and Language Style
Open the dropdown menu to select one or more tone and style preferences that the AI should use when generating content.
This helps ensure that the content aligns with your brand voice and communication style.
Writing Style
Open the dropdown menu to select one or more style preferences that the AI should use when generating content. This helps ensure that the content aligns with your brand voice and communication style.
Word and Sentence Exclusion List
List any specific words or phrases that you wish to exclude from the AI-generated content.
Content Message
The Content Message is the text shared with the post on social media. It appears as Suggested Share Text or simply as the Message for LinkedIn Social Connect users.
Enable this to let the AI generate a suggested text if one isn't provided. This is recommended for consistent messaging.
By using the Content Message Lenght you can also decide if the AI should decide how long, or you can specify the lenght by selecting on of the options from the dropdown menu.
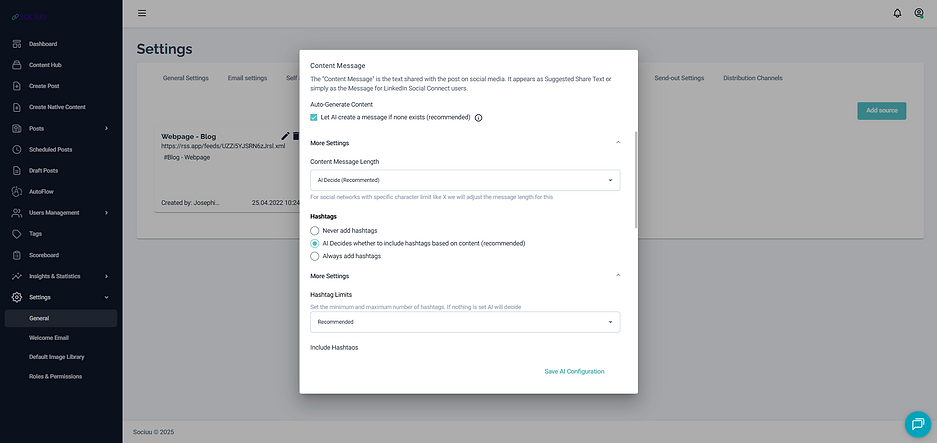
Hashtags
Tell the AI if it should include hashtags or not, and you can even let the AI decide for itself based on the content if it needs hashtag.

Hashtags Limits
By opening the dropdown menu you can set limitations for how many hashtags it should include on piece of content.
By using the Include Hashtags you can add all your corporate-approved hashtags to the list, so the AI knows which to use, and also exclude.
Emojis
Tell the AI if it should either never, always, or decide for itself if it should use emojis on the generated content.
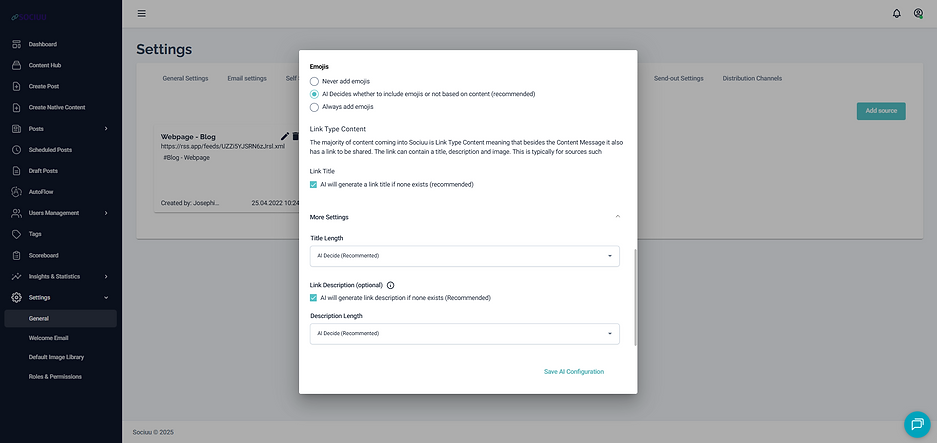
Link Type Content
The majority of content coming into Sociuu is Link Type Content meaning that besides the Content Message it also has a link to be shared. The link can contain a title, description and image.
By enabling this feature, you allow the AI to automatically generate a title and description if they’re missing.
You can also define the preferred length of these AI-generated fields.
When you are happy with all your AI settings, simply click on Save AI Configuration, and you will return to the source creation/edits.
Show In SociuuHub
By enabling this, you are allowing that all content from this source is shown in the users SociuuHub.
Just remember that the usergroup(s) that needs these content visible in their SociuuHub, needs to have this sources tag connected to the usergroup. Read more about this in our last step of this guide on tags.

Auto-Archive Expired Content
By enabling this, you are auto-archiving all expired content from the admin Content Hub.
Content Expiration
By enabling this feature, you can define a number of days after which content from this source will expire. Once expired, the content will no longer be visible to users in their SociuuHub — but it will remain available in the admin Content Hub for reference or reuse.
Direct Post as Default
When this feature is enabled, all content imported from this source will automatically be set as Direct Posts.
This means that when users share the content, it will use the reshare format — resharing the original post from the connected social media channel.
Always Use Image from Image Library
When enabled, this feature ensures that if incoming content from a source does not include an image, Sociuu will automatically select one from your Image Library.
The system will match images based on shared tags — meaning it will choose an image that has the same tag as the content coming in.
Set Active Networks
Choose the social networks where users will be allowed to share content.
For example, if you enable LinkedIn and Facebook, users will see these options whenever they receive content to share.
You can always adjust the selected networks later during the distribution flow, giving you flexibility based on the specific content or audience.
Set Tags
Assign one or more tags at the source level. This means that all content imported from this source will automatically have the selected tag(s) applied.
This helps with organizing, filtering, and targeting content more effectively within Sociuu.

When you’ve completed all the settings, click Add Source to finish.
Content from this source will now appear in your Content Hub.
You can always return later to edit the source settings as needed.
You can choose to disable the entire source at the bottom of the page — without deleting it — allowing you to activate it again later.