Sending Options
There are multiple options you can choose from when you send a post or multiple to your employees.
RANDOM SPLIT
Random split means that your multiple posts will be sent our randomly to your recipients. If you have two posts and 50 recipients, it means that 25 recipients will receive one of the posts, and the other 25 recipients will receive the second post.
It is randomly distributed among the chosen recipients.
To enable random split, create a regular, direct or video post as usual. Once you reach the last step, confirmation, you will see an overview of the sending options.
Click the toggle “Select Random Split” when it is blue, it means that it is enabled.
Please note that Random split only works with multiple posts and multiple recipients.

PULSING
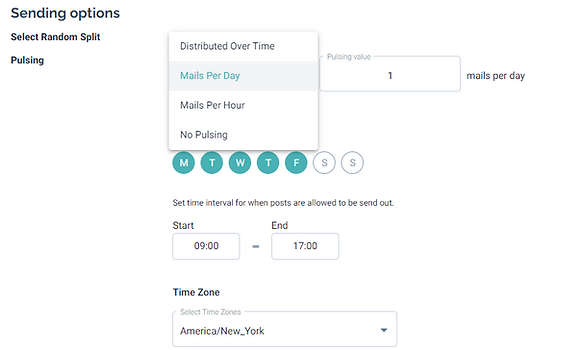
Pulsing lets you send one or multiple posts to employees over a longer period of time chosen by you. It can be an advantage if you are sending out to a larger group of employees and you want to prolong the post’s lifetime.
To enable pulsing, create a regular, direct or video post as usual. Once you reach the last step, confirmation, you will see an overview of the sending options.
-
Go to sending options and pulsing
-
Select the Pulsing period
-
Distribution over Time
-
Mails per Day
-
Mails per Hour
-
No Pulsing
-
-
Choose a time frame
-
Choose the time period for when the emails should be distributed. You can choose: the days, time, and time zones.
-
Note: the time follows the 24H clock.

When you click Finish and send now, the post will be sent out on the first available day you have selected. If you are preparing it on a Friday, but you have selected the email to be sent on Monday, Tuesday, and Wednesday, the first email will be sent on the Monday.
AUTOMATIC RESEND TO NON-OPENERS
There can be many reasons why employees did not open your email. With resend to non-openers you send them a reminder, so they won’t miss out. This can help increase the post-performance.
To enable automatic resend, create a regular, direct or video post as usual. Once you reach the last step, confirmation, you will see an overview of the sending options.
-
Go to resend to non-openers
-
Enable the toggle so it is blue
-
Choose after how many days of your original mail, it should send employees a reminder.

Resend to non-openers is an effective way to send a reminder to employees and increase post engagement.
MANUALLY RESEND TO NON-OPENERS
You also have the opportunity to resend to non-openers manually.
After your post has been sent out you need to:
-
Go to the post list in the menu
-
Click the three dots to the right of the post you would like to resend
-
Select resend to non-openers
It shows you how many of your recipients have not opened the first email and will receive it again.

INVITE NEW USERS
It is possible to invite new users to a post that you have already sent to a group of recipients.
-
Go to the post list in the menu
-
Click the three dots next to the post you would like to send
-
Select Invite new users.
-
Select the new users and send

SCHEDULE POSTS
Scheduling a post can help you plan future post, ensure employees receive posts while you are on holiday, or simply send out the post when you think employees are more likely to act to the email. For example, Friday at 5 pm might not be the best time to send a post to your employees to share – so schedule it for a better time!
To schedule a post, create a regular, direct or video post as usual. Once you reach the last step, confirmation and you have chosen your preferred sending options:
-
Click Finish
-
Choose Schedule post from the options
-
Choose the day and time you would like the post to be sent instead (use the arrows in the top right corner to change the month)
Note: the chosen time, will be in the time zone you are in. If you are sending to employees in other time zones remember to calculate the best time for them to receive your post.
You will find all your scheduled posts in the menu and you can always edit, reschedule or delete scheduled posts.

PREVIEW
Would you like to see a preview of how the email looks before you send it to your employees?
To send a preview to yourself create a regular, direct or video post as usual. Once you reach the last step, confirmation, and you have chosen your preferred sending options:
-
Click Finish in the bottom right corner
-
Select “send preview”
-
You will receive a copy of the email in your inbox which looks like the email your employees will receive once you send it
-
When you have seen the preview you can go back to Sociuu and choose to send, schedule for later or Save as a draft
Note: The preview email you will receive will not have active links. Therefore, you won’t be able to share it. However, when you choose the option “Send post” employees will receive links that can be shared.
